CAReplicatorLayer可以将自己的子图层复制指定的次数,并且复制体会保持被复制图层的各种基础属性以及动画
####基本属性
-
instanceCount
var instanceCount: Int
拷贝图层的次数,包括其所有的子图层,默认值是1,也就是没有任何子图层被复制
-
instanceDelay
var instanceDelay: CFTimeInterval
在短时间内的复制延时,一般用在动画上(支持动画的延时)
-
instanceTransform
var instanceTransform: CATransform3D
复制图层在被创建时产生的和上一个复制图层的位移(位移的锚点时CAReplicatorlayer的中心点)
-
preservesDepth
var preservesDepth: Bool
如果设置为YES,图层将保持于CATransformLayer类似的性质和相同的限制
-
instanceColor
var instanceColor: CGColor?
设置多个复制图层的颜色,默认位白色
-
instanceRedOffset
var instanceRedOffset: Float
设置每个复制图层相对上一个复制图层的红色偏移量
-
instanceGreenOffset
var instanceGreenOffset: Float
设置每个复制图层相对上一个复制图层的绿色偏移量
-
instanceBlueOffset
var instanceBlueOffset: Float
设置每个复制图层相对上一个复制图层的蓝色偏移量
-
instanceAlphaOffset
var instanceAlphaOffset: Float
设置每个复制图层相对上一个复制图层的透明度偏移量
实例
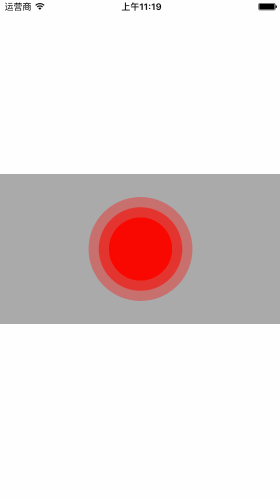
首先我们来实现一个类似于雷达的动画,想必大家都见过这样的动画,其实使用复制图层实现起来特别的简单,这是一个比较简单的Demo,大家可以通过给图层设置图片,或者使用上一篇我们提到的CAGradientLayer来实现更加炫酷的动画
1
2
3
4
5
6
7
8
9
10
11
12
13
14
15
16
17
18
19
20
21
22
23
24
25
26
27
28
29
30
31
32
33
34
35
36
37
38
39
40
41
42
43
44
45
46
47
48
49
50
51
52
53
54
55
56
57
58
|
import UIKit
class ViewController: UIViewController {
var replicatorLayer:CAReplicatorLayer!
let kWidth = UIScreen.mainScreen().bounds.size.width
override func viewDidLoad() {
super.viewDidLoad()
setupUI()
}
func setupUI() {
let animationView = UIView()
animationView.bounds = CGRectMake(0, 0, kWidth, 200)
animationView.center = self.view.center
self.view.addSubview(animationView)
animationView.backgroundColor = UIColor.lightGrayColor()
animationView.clipsToBounds = true
let animationLayer = CAShapeLayer() 动画图层,就是不停变大的那个圆
animationLayer.backgroundColor = UIColor.redColor().CGColor
animationLayer.bounds = CGRectMake(0, 0, 20, 20)
animationLayer.cornerRadius = 10
animationLayer.position = CGPointMake(kWidth/2, 100)
let transformAnim = CABasicAnimation(keyPath: "transform")
let value = NSValue.init(CATransform3D: CATransform3DMakeScale(10, 10, 1))
transformAnim.toValue = value
transformAnim.duration = 2
let alphaAnim = CABasicAnimation(keyPath: "opacity")
alphaAnim.toValue = 0
alphaAnim.duration = 2
let animGroup = CAAnimationGroup()
animGroup.animations = [transformAnim,alphaAnim]
animGroup.duration = 2
animGroup.repeatCount = HUGE
animationLayer.addAnimation(animGroup, forKey: nil)
replicatorLayer = CAReplicatorLayer()
replicatorLayer.addSublayer(animationLayer);
replicatorLayer.instanceCount = 3
replicatorLayer.instanceDelay = 0.3
animationView.layer.addSublayer(replicatorLayer)
}
}
|
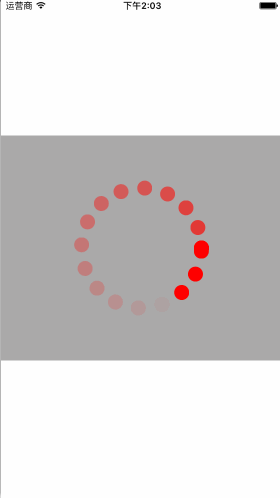
接下来介绍几个加载动画的用法~
1
2
3
4
5
6
7
8
9
10
11
12
13
14
15
16
17
18
19
20
21
22
23
24
25
26
27
28
29
30
31
32
33
34
35
36
37
38
39
40
41
42
43
44
45
46
47
48
49
50
51
52
53
54
| //
// ViewController.swift
// CAReplicatorLayer
//
// Created by 蔡士林 on 6/17/16.
// Copyright © 2016 BZ. All rights reserved.
//
import UIKit
class ViewController: UIViewController {
var replicatorLayer:CAReplicatorLayer!
let kWidth = UIScreen.mainScreen().bounds.size.width
override func viewDidLoad() {
super.viewDidLoad()
setupUI()
}
func setupUI() {
let animationView = UIView()
animationView.bounds = CGRectMake(0, 0, kWidth, 300)
animationView.center = self.view.center
self.view.addSubview(animationView)
animationView.backgroundColor = UIColor.lightGrayColor()
animationView.clipsToBounds = true
let animationLayer = CAShapeLayer()
animationLayer.backgroundColor = UIColor.redColor().CGColor
animationLayer.bounds = CGRectMake(0, 0, 20, 20)
animationLayer.anchorPoint = CGPointMake(0.5, 0.5)
animationLayer.position = CGPointMake(0, animationView.center.y)
animationLayer.cornerRadius = 10
let path = CGPathCreateMutable() // 创建转圈的动画
CGPathAddEllipseInRect(path, nil, CGRectMake((animationView.bounds.size.width-160)/2, (animationView.bounds.size.height-160)/2, 160, 160))
let transformAnim = CAKeyframeAnimation(keyPath: "position")
transformAnim.duration = 4
transformAnim.repeatCount = HUGE
transformAnim.path = path
animationLayer.addAnimation(transformAnim, forKey: nil)
replicatorLayer = CAReplicatorLayer()
replicatorLayer.addSublayer(animationLayer);
replicatorLayer.repeatCount = HUGE
replicatorLayer.instanceCount = 20
replicatorLayer.instanceDelay = 0.2 // 动画延迟
replicatorLayer.instanceAlphaOffset = -0.05 // 透明度递减
animationView.layer.addSublayer(replicatorLayer)
}
}
|
另一个炫酷的动画,带大小缩放的动画

1
2
3
4
5
6
7
8
9
10
11
12
13
14
15
16
17
18
19
20
21
22
23
24
25
26
27
28
29
30
31
32
33
34
35
36
37
38
39
40
41
42
43
44
45
46
47
48
49
50
51
52
53
54
55
56
57
58
|
import UIKit
class ViewController: UIViewController {
var replicatorLayer:CAReplicatorLayer!
let kWidth = UIScreen.mainScreen().bounds.size.width
override func viewDidLoad() {
super.viewDidLoad()
setupUI()
}
func setupUI() {
let animationView = UIView()
animationView.bounds = CGRectMake(0, 0, kWidth, 300)
animationView.center = self.view.center
self.view.addSubview(animationView)
animationView.backgroundColor = UIColor.grayColor()
animationView.clipsToBounds = true
let animationLayer = CAShapeLayer()
animationLayer.backgroundColor = UIColor.redColor().CGColor
animationLayer.bounds = CGRectMake(0, 0, 20, 20)
animationLayer.position = CGPointMake(self.view.bounds.size.width/2, 50)
animationLayer.borderColor = UIColor.whiteColor().CGColor
animationLayer.cornerRadius = 2
animationLayer.borderWidth = 1
animationLayer.transform = CATransform3DMakeScale(0.1, 0.1, 0.1)
let transformAnim = CABasicAnimation(keyPath: "transform")
transformAnim.duration = 2
transformAnim.repeatCount = HUGE
transformAnim.fromValue = NSValue.init(CATransform3D: CATransform3DMakeScale(1, 1, 1))
transformAnim.toValue = NSValue.init(CATransform3D: CATransform3DMakeScale(0.1, 0.1, 0.1))
animationLayer.addAnimation(transformAnim, forKey: nil)
replicatorLayer = CAReplicatorLayer()
replicatorLayer.frame = CGRectMake(0, 0, self.view.bounds.size.width, 300)
replicatorLayer.addSublayer(animationLayer);
replicatorLayer.instanceCount = 20
replicatorLayer.instanceDelay = 0.1
let angle = CGFloat(2*M_PI) / CGFloat(20)
replicatorLayer.instanceTransform = CATransform3DMakeRotation(angle, 0, 0, 1.0)
animationView.layer.addSublayer(replicatorLayer)
}
}
|
我的配色比较渣渣,所以看起来不够酷,但是只要你有心,肯定是酷毙了,其实也可以通过关键帧的动画,实现书写文字啊等更加复杂的动画,以后有时间的话,会继续补充完整~